Note: Login using Drupal Login/your username and not your CWL.
Basic Usage
1. How to update your password
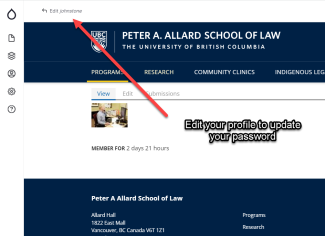
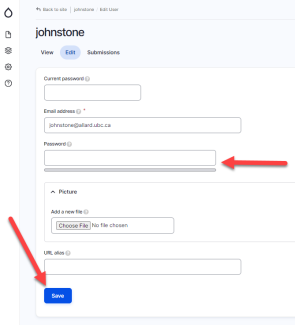
The first time you login using your temporary password, please ensure you update your password. It's recommended that you do not use the same password as your CWL.
2. How to edit a page
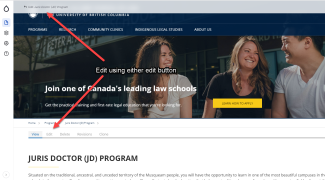
1. Browse to the page you want to edit and select the edit button:
2. Or find the page through the "content" menu bar:
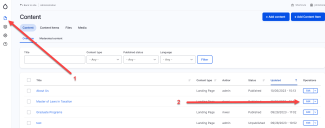
- Click "save" to make your changes live.
Tip: When editing text on a page, if you want a single line break (instead of a paragraph break), use "shift+enter" instead of just "enter".
3. Optional: If you want to preview unfinished content, change the page status to "Draft" on the right side menu, then click "save" at the top. This will allow you to preview your changes without making them live.
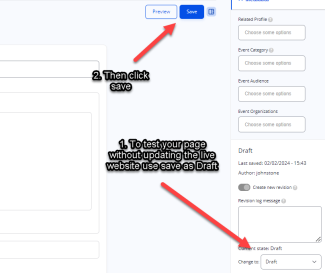
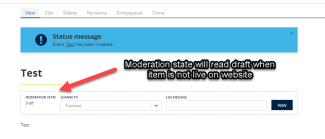
You will know that it is not on the live website when it shows that the moderation state is "Draft"
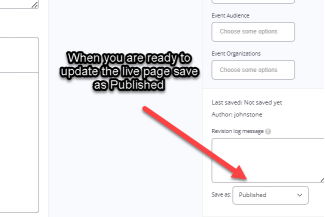
4. When you are happy with how it looks, change save as to "Published" and click "save" at the top. Your content is now live on the website.
3. Linking to other pages and creating buttons
- Highlight the text you wish to add the link to
- Click the link button (CTRL-K) in the editor

- Enter the page title or URL. Hint: If there are multiple pages with the same title, note the "node" number.
- If you wish to make this text into a button, under the styles drop down, select from the choice of "buttons."
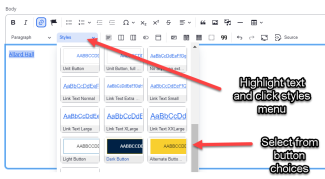
In step 3, if you need to find a "node" number of a page, edit the page and the URL will denote the note. E.g, When editing this page, https://allard.ubc.ca/node/141/edit, the node is 141.
4. Uploading images
1. Select the media library button in the editor.
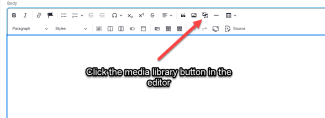
2. When uploading images, select "choose files" and select the file from your computer to upload.

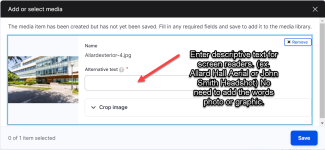
3. Be sure to add "alternative text" describing your image to increase accessibility. The alt text will be read aloud when a user is using a screen reader.
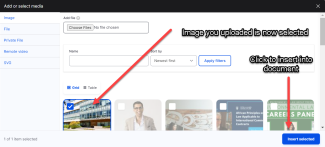
5. Click "insert selected" to insert the image into your page.
6. To center the image, or select formatting, click "edit media" (not shown here). An edit media pop up will appear:
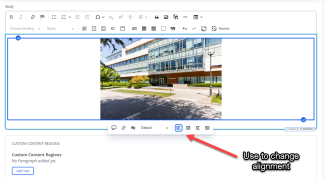
If you'd like the image to take up the full width of the page, change "default" to "wide".
5. Uploading and linking files/PDFs
1. Open the Media Library in the editor
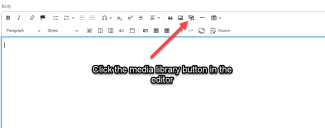
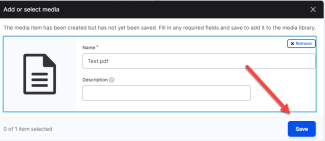
2. Choose "file" on the left hand window, click the "choose file" button and select the file you wish to upload. Once the file is uploaded, click save.

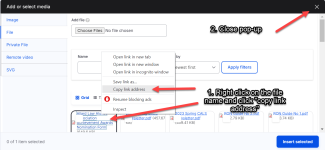
3. Once the file is saved and uploaded, right click the file name and click "Copy Link Address" (if you're using Chrome) to save the URL of the file to your clipboard. Close pop up the media library pop-up (do not click "insert selected").
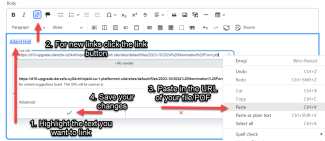
4. Highlight text you wish to link (if the link already exists, you can double click the link to change the URL), click the link button (Ctrl-K) and paste in the link (that you copied to your clipboard in step 3).
Advanced Usage
6. Landing page overview
Overview
Editing Cards
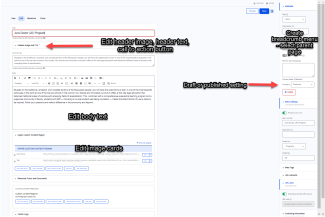
1. In the "upper custom content region", you can edit a "card group".

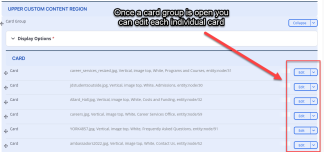
2. Once a "card group" is expanded, you can edit individual cards.
7. Using the WYSIWYG editor
8. Column layouts
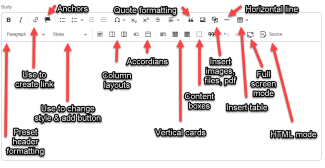
Column layouts allow you to format content to be side by side easily. Columns are mobile friendly and will automatically resize. The columns are an alternative to formatting in tables (which are not mobile friendly)
There are two layout options that can be mixed and matched: 2 column and 3 columns.

Once you add a column option, you can adjust the columns with by changing the "layout options" to: equal width, large left or large right.

2 Column - Equal Width
First column
"Lorem ipsum dolor sit amet, consectetur adipiscing elit, sed do eiusmod tempor incididunt ut labore et dolore magna aliqua. Ut enim ad minim veniam, quis nostrud exercitation ullamco laboris nisi ut aliquip ex ea commodo consequat. Duis aute irure dolor in reprehenderit in voluptate velit esse cillum dolore eu fugiat nulla pariatur. Excepteur sint occaecat cupidatat non proident, sunt in culpa qui officia deserunt mollit anim id est laborum."
Second Column
"Lorem ipsum dolor sit amet, consectetur adipiscing elit, sed do eiusmod tempor incididunt ut labore et dolore magna aliqua. Ut enim ad
2 Column - Large Left
First column
"Lorem ipsum dolor sit amet, consectetur adipiscing elit, sed do eiusmod tempor incididunt ut labore et dolore magna aliqua. Ut enim ad
Second Column
minim veniam, quis nostrud exercitation ullamco laboris nisi ut aliquip ex ea commodo consequat. Duis aute irure dolor in reprehenderit in voluptate velit esse cillum dolore eu fugiat nulla pariatur. Excepteur sint occaecat cupidatat non proident, sunt in culpa qui officia deserunt mollit anim id est laborum."minim veniam, quis nostrud exercitation ullamco laboris nisi ut aliquip ex ea commodo consequat. Duis aute irure dolor in reprehenderit in voluptate velit esse cillum dolore eu fugiat nulla pariatur. Excepteur sint occaecat cupidatat non proident, sunt in culpa qui officia deserunt mollit anim id est laborum."
2 Column - Large Right
First column
minim veniam, quis nostrud exercitation ullamco laboris nisi ut aliquip ex ea commodo consequat. Duis aute irure dolor in reprehenderit in voluptate velit esse cillum dolore eu fugiat nulla pariatur. Excepteur sint occaecat cupidatat non proident, sunt in culpa qui officia deserunt mollit anim id est laborum."
Second Column
"Lorem ipsum dolor sit amet, consectetur adipiscing elit, sed do eiusmod tempor in
3 columns
First column
"Lorem ipsum dolor sit amet, consectetur adipiscing elit, sed do eiusmod tempor in
Second Column
"Lorem ipsum dolor sit amet, consectetur adipiscing elit, sed do eiusmod tempor in teur sint occaecat cupidatat non proident, sunt in culpa qui officia deserunt mollit anim id est laborum."
Third Column
"Lorem ipsum dolor sit amet, consectetur adipiscing elit, sed do eiusmod tempor in
You can mix column style with images and quotes for numerous layouts
1/3 column with image
First Column

Second Column
Lorem ipsum dolor sit amet, consectetur adipiscing elit, sed do eiusmod tempor in teur sint occaecat cupidatat non proident, sunt in culpa qui officia deserunt mollit anim id est laborum."
Lorem ipsum dolor sit amet, consectetur adipiscing elit, sed do eiusmod tempor in teur sint occaecat cupidatat non proident, sunt in culpa qui officia deserunt mollit anim id est laborum."
Lorem ipsum dolor sit amet, consectetur adipiscing elit, sed do eiusmod tempor in teur sint occaecat cupidatat non proident, sunt in culpa qui officia deserunt mollit anim id est laborum."
2 column - Large left with Quote
First Columnd
Lorem ipsum dolor sit amet, consectetur adipiscing elit, sed do eiusmod tempor in teur sint occaecat cupidatat non proident, sunt in culpa qui officia deserunt mollit anim id est laborum."
Lorem ipsum dolor sit amet, consectetur adipiscing elit, sed do eiusmod tempor in teur sint occaecat cupidatat non proident, sunt in culpa qui officia deserunt mollit anim id est laborum."
Quote goes here
9. In page anchors
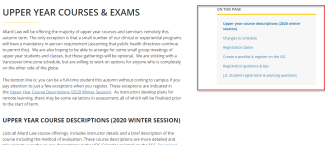
In page anchors are useful for pages with a lot of content and/or several sections. In page anchors allow users to quickly navigate within the page. You can see an example on this Exams page.
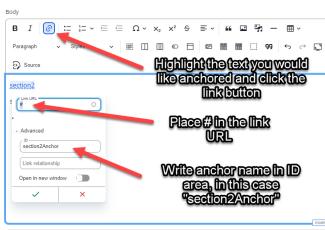
1. Create text where you want to jump to (e.g., "section2"). Highlight this text and then click the "link" button in the editor.
In the pop up window, place "#" in the link URL, then click the "+" next to "Advanced." Write in the anchor name in the "ID" field (e.g., section2Anchor). As a naming convention we use "the name of the anchor" then "Anchor". Then click the check mark to save this link.
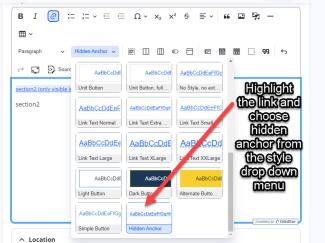
2. Highlight the link that you've created and select "Hidden Anchor" from the styles drop down menu. The anchor will now have a bracket beside it reading "(only visible in edit mode)" meaning that the anchor text will be invisible to the viewer.
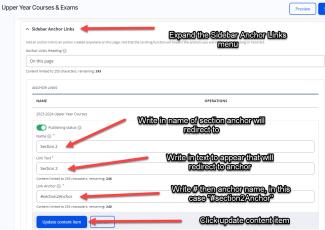
3. Scroll down below the body section to the Sidebar Anchor Links section and expand the section. Under "Name" field write the name of the section your anchor will redirect to. Under "Link Text" field write the text of the link that will redirect to your anchor. Under the "Link Anchor" field write "#" then the anchor name, in this case "#section2Anchor". Then click update content item and save the page. The sidebar anchor link will now link to the anchor point outlined in your text above.
